Below is a step by step guide on how to get started with Google Shopping as a retailer.
1.Set Up a Google Merchant Center Account
The first step to getting your products featured in Google Shopping results is to create a Google Merchant Center account. This will serve as a home base for your products and product information.
Setting up a Google Merchant Center account is easy, all you need to do is to go to “Merchant center” and sign in with your Gmail account. You will be required to provide your business information such as business name and business address.
You will also need to select where you want your customers to checkout, your email preference, and your management platforms.
2. Optimize Your Product Imagery
As stated earlier Google uses featured images from your website to index search results. This is why it is important to ensure that product images on your website are optimized and suitable for use on Google feeds.
You may not know this but your product images are the most important part of your listing and shopper’s decisions of whether or not to buy your product can be hinged on the quality of picture they view on your listing.
Considering how important pictures are to listings, Google rejects campaigns with low-quality images. There is no way to escape optimizing your images because Google constantly conducts quality checks and will suspend accounts that default on quality.
When optimizing images on your website the following Google’s image guidelines should be followed:
- The lighting should be clear and even.
- Solid white, grey, or a light colored background should be used.
- The Product scale should not be too big or too small. Ideally, it should be between 75 percent to 90 percent of the full image.
- Apparel products should be shown on the body.
- Rear views and close-up photos should be used as the main image, they can however be used as additional images.
- Image tweaks like fringing, blurring, pixelation, JPEG additions, and fading out should be avoided.
- Use shadows to create depth and provide multiple angles of your product.
- Feature real people using your product.
3. Create Your Product Feed
For you to be able to upload your product data on Google Merchant Center, you need to create a product feed. This is where the data will be submitted. Google can find and display your products to relevant searches with the data in your product feed.
When a feed is created, it can be updated without having to register afresh but if it’s a new feed, you will be required to create a different product feed.
There are two types of product feeds; primary feed and supplemental feed.
Let’s examine each type.
Primary Feeds
This is the required data source used by the merchant center to display your product on Google. Primary feeds are the only type of feeds that allow retailers to add or remove products.
Asides from adding or removing products, you can set feed rules for your product data, set language, and target countries.
Google recommends that all products for all features should be submitted in a single feed. If however, you choose to submit separate primary feeds for online and local ads and listings, you need to ensure that both feeds do not have the same products.
How to create a Primary Feed
To create a primary feed, do the following:
- Go to the navigation menu in Merchant Center
- Click Products and then click Feeds
- To create a new primary feed, click the plus (+) button in the primary feed section
Provide the following information about your data:
- Language: This is the language you want your product data to be written in.
- Country of Sale: This is the main country the products in your feed are sold. The product data must meet the requirements for the selected country.
- Destination: You can choose one or more destinations
- Add Multiple Countries: This enables you to specify the additional countries you will like to show your products. This doesn’t alter your country of sale. The additional countries you select must have the same language as the one you chose for the feed.
- Primary Feed Name: This is a descriptive name that will help you identify the primary feed.
Select an Input Method: There various input methods you can choose from
- Google Sheets: You can use a generated sheets template or an existing Google sheet with your product date.
- Upload: You can choose to upload the files manually or using SFTP, Google Cloud Storage, or FTP. To manually upload a feed, click on the 3 dot icon in the processing tab of your feed then select your upload preference from the drop-down that is displayed.
- Scheduled Fetch: With this input method, google will fetch your feed data directly from your server.
Website Crawl: This input method comes in handy when you don’t have any feeds in your account but the structured data are available on your website. Google will crawl your website to get the required product data.
- Provide the File name: This is optional, depending on the input method you used for the upload. You will be required to enter the file name which must exactly match the name of the file you create.
- When all the information has been provided click Continue.
- To view and manage your newly created feed, click the “Feeds” section of your Merchant Center Account.
Supplemental feeds
This feed creates supplemental or additional data that can be added to the existing product data in your primary feed. Unlike the primary feeds, the supplemental feed cannot be used alone either can you add or remove products with it. They are only used to update existing product data.
Supplemental feeds can only be used to update product data if it contains IDs that are already existing in the primary feed.
Required Product Attributes
There are certain product attributes that Google uses when creating your shopping ads and this information should be provided on your spreadsheet when creating your primary feeds.
Below is a list of some required product attributes.
- ID: This is the unique identifier of your product. In one case you can use the SKU of the product as the ID.
- Title: The title of the product in your feeds should match the title on the product landing page. It is advisable to add specifics of the product like the stole, color, and size to the title.
- Description: The description should be accurate and only include information about the product. Be as detailed as possible but avoid fluff. The information in the description also has to match that on the landing page.
- Landing Page Link: The URL to the landing page of your product must be included, this is what will be placed on the ads. The link should start with HTTPS or HTTP.
- Image Link: The URL for the main image of the product should be included. It should also start with HTTP or HTTPS.
- Product Price: The price you put in the primary feeds must match the product price on your landing page. The currency also needs to be the same as the currency of the country of sale you choose.
- Product Availability: You need to state if the product is in stock or out of stock. The availability of the product on your feeds must match its availability on your landing page or website.
- Brand: This is the product’s brand name, especially the one recognized by shoppers.
- Product Category: The product category provided must tally with the category specified by Google.
4. Link to your Google AdWords Account

Image Source
Creating an account with Google Merchant Center only enables Google to get your product information. For consumers to see your product, you need to link your Google Ads account. When you do this, your Google Shopping campaigns can now run and your products will be displayed in search results.
Across all industries, the conversion rate for Google Ads for search is 3.75 percent.
To link your Google Ads account, do the following:
- Log in to your Google Merchant Center account.
- Click on the 3 vertical dots at the top right-hand corner of the page.
- When the menu is expanded, click “Account Linking”
- You can create a Google Ads account from this page if you don’t have one.
- If you already have an account, click “Link Account” and enter your Adword ID.
- Once you do this your Adword account has been linked.
5. Create a Google Shopping Campaign
When your Google Ads account is linked, you will be able to create a campaign and advertise your product.
The first thing you should do when creating a Google Shopping campaign is to choose a campaign goal. The goal can be to make sales, generate leads, or drive website traffic.
Sales campaigns are aimed at driving both online and in-person sales, leads campaigns are aimed at generating leads and conversions by prompting shoppers to complete an action while website traffic campaigns are aimed at bringing the right people to a website.
Choosing a campaign goal is important because it enables Google to tailor each campaign to suit your goal thereby guaranteeing the success of the campaign.
After choosing your campaign goal, you will need to choose a campaign type. Your campaign type is set to Shopping.
The next thing you will need to do is to choose the campaign subtype.
There are two different ways to Create a Google Shopping campaign. These methods are examined below:
1.Through Google Merchant Center Account
This is done after linking your Google AdWords account and it can be done from the same page.
All you need to do is:
- Click on “Create Shopping Campaign”
- Insert the campaign name, daily budget, and country of sale.
- Click “Create”.
2. Through Google Ads
You can create your Google Shopping campaign through Google Ads. To achieve this, do the following:
- Log in to your Google Ads account
- Go to the left-hand side menu and open the Campaigns tab.
- Click the blue plus (+) icon.
- Choose campaign.
6. Place Bids on your Shopping Campaign
Bidding is how you will pay for people to see, click, and interact with your ads.
After creating a Google Shopping campaign, you will need to select your bidding strategy and set your budget for the campaign. This will be done under your Google Shopping setting.
You can select your bid strategy by choosing Manual CPC (this means you set the maximum CPC for your ads) or with “Maximize Clicks”. With maximize clicks, Google Ads will automatically set your bids to get as many clicks as your budget can accommodate.
As stated earlier, you need to choose your campaign budget which is the average amount of money you want to spend each day. Google doesn’t cap this amount daily, instead, it will be calculated every month.
This means that in a month your campaign expenditure won’t exceed your daily budget multiplied by the number of days in each month.
For example, if your budget for May is set to $50, Google will interpret it to mean that you are willing to spend $50 x 31 days which is a total of $1550. The ad spend for a day may exceed your daily budget of $50 but Google won’t allow it to exceed $1550 for May.
You can set your budget to standard spend which lets your budget be spent evenly over time or accelerated spends which allows the budget to be spent faster.
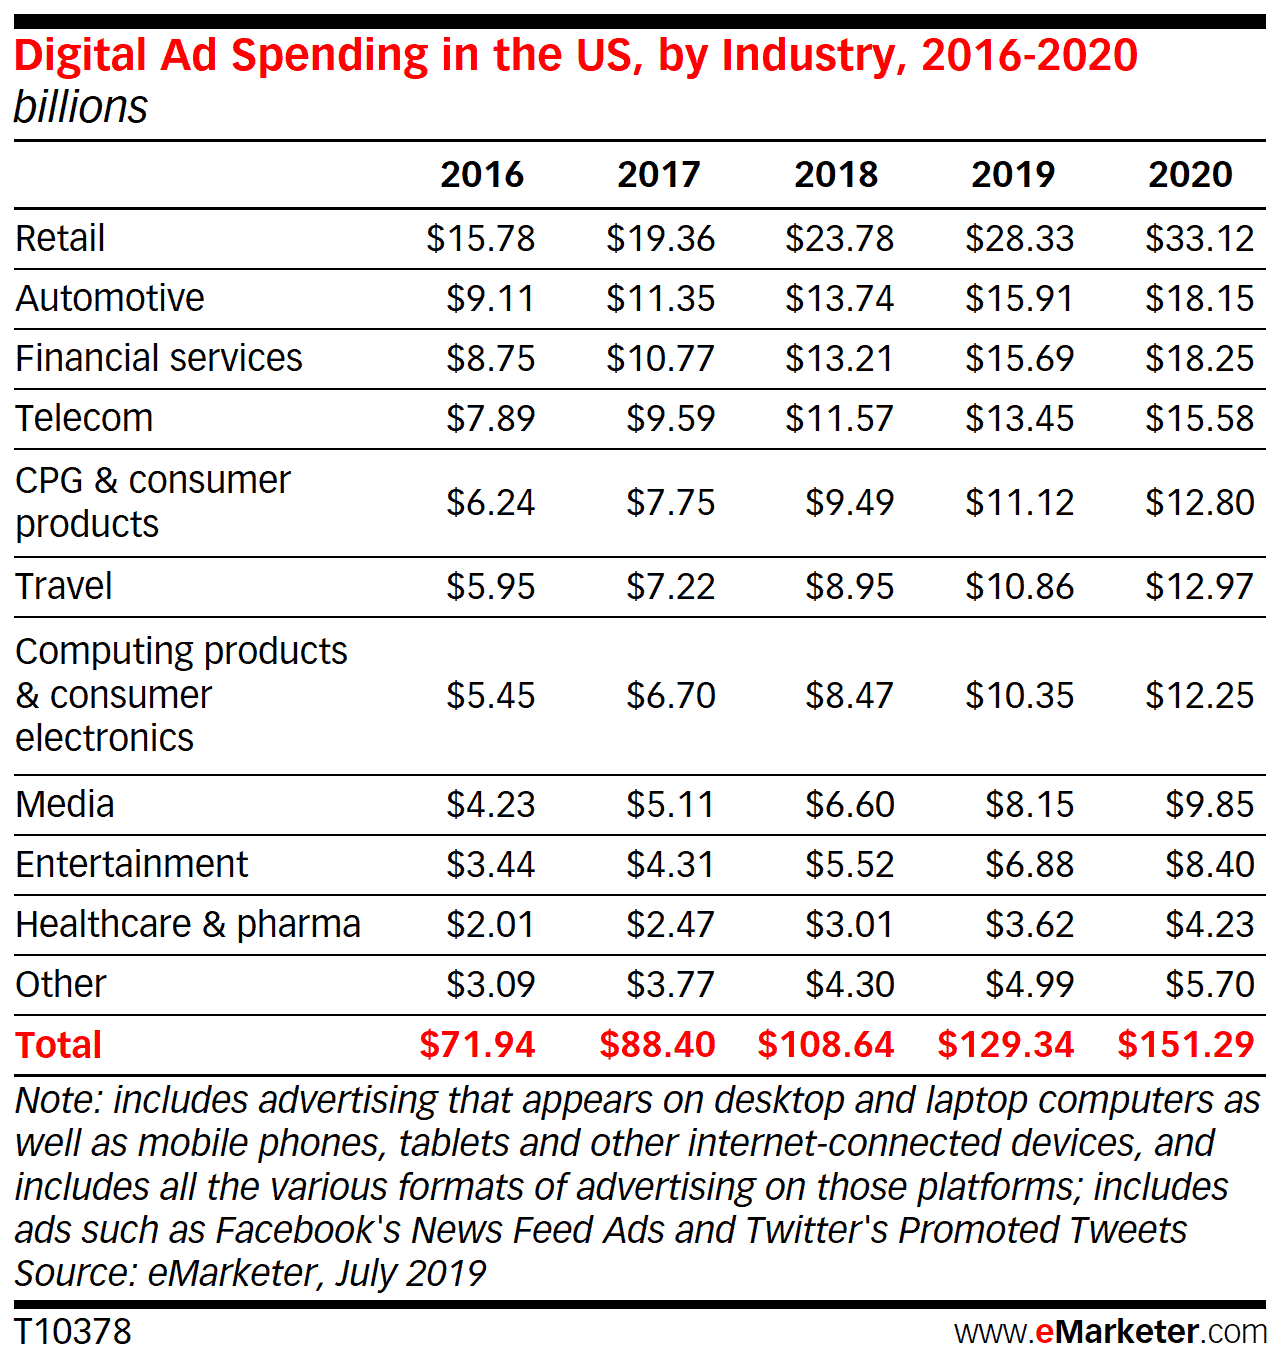
Below is a chart showing the average ad spend per industry.

Chart source
7. Schedule and Target your Shopping Campaign
This is a very important aspect of your campaign because it determines who can see your ads and when they can see it. This is done in the Google Shopping campaign settings.
To schedule and target your campaigns do the following:
- It is important to note that the Networks and Devices Settings should not be changed. Skip them and proceed to the next step.
- Select the locations you want your ads to target. The locations you choose should be places where you are located or can easily ship to.
- Set the start and end dates for the shopping campaign. Note that if you do not set an end date, your ad will continue to run indefinitely and this can cost you more money than your budget.
8. Build Ad Groups
Ad groups determine the type of ads you will run and how the bidding for those ads should be organized. Google will prompt you to build ad groups for your campaigns after the shopping campaign settings have been completed.
There are two types of ad groups namely product shopping ads and showcase shopping ads.
Product shopping ads are used to promote single products while showcase shopping ads enable you to advertise more than one product as a part of a lifestyle or product ad that represents your brand.
The introduction of showcase shopping ads has skyrocketed the volume of shopping traffic Google gets. Within just nine months of its introduction in 2018, Google’s traffic share tripled.
If you choose Product Shopping ad, do the following:
- Enter your ad group name.
- Set a maximum CPC bid
- To further filter your products, you can create separate ad groups for different categories.
- Click Save.
If you choose Showcase shopping ad groups, do the following:
- Enter your ad group name
- Set a maximum Cost per engagement bid.
- Choose what products you want to advertise.
- Click Save.
Once you click save, your campaign is submitted and it will go live at the time you scheduled for it to start.
Google Shopping Management
Require consulting advice or Google shopping management? You may be interested in our Google Shopping agency services.


